
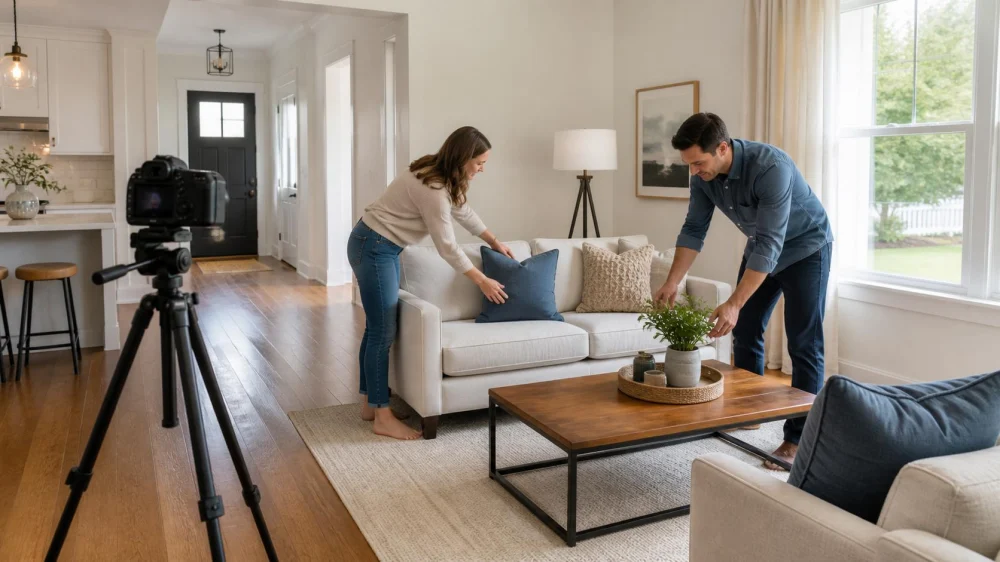
How to Prepare Your Home for Real Estate Photos
On this page
Quick answer
Prepare for real estate photos by reducing visual clutter, cleaning visible surfaces, opening clear walking paths, and checking every room from the camera’s likely viewpoint. Confirm which spaces will be photographed, remove private or identifying items, replace failed bulbs, and finish outdoor details. On photo day, secure people, pets, valuables, and access instructions.
Photo preparation is the process of making each space clear, accurate, and easy to understand in listing images. The goal is not to disguise condition or create a different property; it is to help the camera show the home’s layout, light, and maintained features without avoidable distractions.
787 Seventh Avenue / 787 seventh avenue new york
New YorkNew York CountyNew York
787 7th Ave, New York, NY 10019, USA
Confirm the photography plan
Ask the listing agent or photographer what the session includes. Preparation differs for still photos, video, floor plans, aerial images, twilight images, and virtual tours.
- Which interior rooms, storage areas, outbuildings, and exterior spaces will appear?
- What time will the photographer arrive, and how long is access expected?
- Should window coverings, lights, ceiling fans, fireplaces, or screens be adjusted?
- Will a floor-plan device or panoramic camera need clear central floor space?
- Are vehicles, trash bins, hoses, seasonal items, or signs expected to be moved?
- Who will make final styling decisions and lock the property afterward?
Follow the photographer’s instructions when they differ from generic advice. Some professionals prefer all lights on; others balance natural light and switch selected fixtures off. Confirm rather than guessing.

West 130 / 130 west hempstead apartments
West HempsteadNassau CountyNew York
130 Hempstead Ave, West Hempstead, NY 11552, USA
Edit the room before cleaning
Declutter first. Cleaning around too many objects wastes time, and small items become more visually prominent in a wide-angle image.
- Remove personal information. Put away mail, calendars, school names, medical items, work documents, keys, access codes, and identifiable family displays.
- Reduce surfaces. Keep only a few intentional objects on counters, tables, desks, and shelves.
- Open the floor. Remove baskets, cords, small stools, and excess furniture that interrupt walking paths.
- Balance—not empty—the room. Keep enough furniture to explain scale and function unless the property is being photographed vacant.
- Create a temporary holding plan. Move packed items completely out of photographed areas rather than shifting clutter from room to room.
Use closets or garages for temporary storage only if those spaces will not be photographed and the arrangement remains safe. Do not block electrical panels, mechanical equipment, exits, or access the photographer needs.
Use a room-by-room checklist
Kitchen
- Clear most counter appliances, dish racks, magnets, notes, and cleaning products.
- Clean counters, sink, appliance fronts, backsplash, and visible floor edges.
- Remove trash, recycling, pet bowls, towels, and items stored above cabinets.
- Straighten stools and leave a simple focal point only if it suits the room.
Living and dining areas
- Straighten seating, cushions, rugs, chairs, lampshades, and window coverings.
- Reduce cords, remote controls, toys, exercise equipment, and personal collections.
- Check that furniture does not conceal important built-in features or block the room’s flow.
- Clean reflective surfaces, dark screens, glass tabletops, and visible vents.
Bedrooms
- Make beds simply, smooth bedding, and align pillows.
- Clear nightstands and remove laundry, charging cords, personal photos, and valuables.
- Close drawers and closet doors unless the photographer requests otherwise.
- Remove items visible under the bed or behind doors.
Bathrooms
- Clear toiletries, medications, toothbrushes, bath mats, scales, and cleaning tools.
- Clean mirrors, fixtures, glass, counters, grout lines, and toilet surfaces.
- Close the toilet lid, hang fresh neutral towels, and check the shower curtain.
- Remove used towels, wastebaskets, and personal hygiene items from view.
Office, utility, and flexible rooms
- Hide documents and screens that reveal private or employer information.
- Group cables neatly without disconnecting essential systems unsafely.
- Make the room’s current function understandable while preserving usable floor space.
- Clean around laundry machines, mechanical equipment, and built-in storage without hiding access.
Prepare the exterior and entry
The first exterior image often needs a clear view of the approach and front elevation. Preparation should match the season and the property, not imitate a different climate or landscape.
- Move vehicles as agreed and confirm local parking or access limits.
- Put away hoses, tools, toys, bins, delivery boxes, and portable decorations.
- Sweep the path, steps, porch, and visible hard surfaces.
- Trim only routine overgrowth you can handle safely; leave risky tree or roof work to professionals.
- Clean the front door, visible glass, house lights, and outdoor seating.
- Secure pets and remove pet waste from outdoor areas.
Do not remove safety equipment, required notices, property markers, or material features merely to improve a photograph. Discuss any question with the listing professional.
Handle photo day
- Do a phone-camera walk-through at standing height; distractions are often easier to spot in a frame.
- Replace failed bulbs with appropriate matches and test fixtures safely.
- Open or position window coverings as instructed and clean obvious glass marks.
- Set the indoor temperature and confirm the photographer can enter every planned space.
- Remove people from the image path and secure pets in a location that will not be photographed.
- Put away valuables, keys, financial papers, devices, medication, and identity documents.
- Give access instructions to the responsible person and agree on lock-up afterward.
Mistakes to avoid
- Over-staging: too many props make rooms look smaller and distract from fixed features.
- Hiding everything in a photographed space: a packed garage, shower, closet, or spare room still appears packed.
- Last-minute major projects: unfinished paint, repairs, or landscaping can create more visual problems than they solve.
- Ignoring reflections: mirrors and glass can reveal people, clutter, documents, or adjacent rooms.
- Trying to conceal defects: photography preparation should not misrepresent material condition.
Important notes and limitations
This is general preparation guidance for home sellers in the United States, not staging, photography, legal, disclosure, or safety advice. Listing rules and seller obligations vary by location and transaction. Follow current instructions from your real estate and photography professionals.
Evidence note: These recommendations reflect common visual-presentation practice: simplify competing elements, clean what the camera sees, show room function, protect private information, and maintain accurate representation. They do not guarantee buyer interest, a sale, or a particular price.
Use qualified help for high windows, roofs, ladders, heavy furniture, electrical problems, tree work, repairs, or any task beyond your ability. If a condition may be material to buyers, ask the appropriate professional how it should be handled and disclosed; do not rely on camera angle or editing to hide it.
Frequently asked questions
Should family photos come down?
Remove images and items that identify residents or reveal personal information. A few neutral frames may be replaced with simple art if needed, but the room does not have to become anonymous or empty.
Should all lights be turned on?
Ask the photographer. The answer depends on their lighting method, color balance, daylight, and the property. Replace failed bulbs and make fixtures accessible, then follow the session plan.
Do I need professional staging?
Not every home does. Consider the property, budget, furniture, timeline, and guidance from the listing professional. A clean, clear, accurately presented room is a practical baseline.
Can I stay home during the session?
Confirm with the agent or photographer. Fewer people generally make camera movement easier, but someone may need to provide access. Whatever the plan, protect privacy and keep people and pets out of the frame.
Next steps
- Confirm the image types, spaces, arrival time, and photographer preferences.
- Remove private items and reduce clutter before deep cleaning.
- Work through the kitchen, living areas, bedrooms, bathrooms, flexible rooms, and exterior.
- Complete safe minor fixes and leave risky or technical work to professionals.
- Run a phone-camera check, then secure access, pets, people, and valuables.
Good photo preparation is mostly disciplined editing: remove what competes with the room, clean what remains, protect private details, and let the images show the property’s real layout and features clearly.




 New Village at Patchogue4.0 (219 reviews)
 Tracey Real Estate, Inc.3.0 (29 reviews)
 Homes by Kelly-Coldwell Banker American Homes0.0 (0 reviews)
 J and P Management Company, LLC3.0 (5 reviews)
 REALTY NETWORK OF NEW YORK CORP0.0 (0 reviews)
 DJK Residential5.0 (1 reviews)
 Tips for Negotiating Real Estate Deals Successfully
 How to Negotiate the Best Deal
 How to Find a Real Estate Agent for a Co-op Apartment Purchase
 Understanding the Pros and Cons of Short-Term Rentals
 How to Sell a Home in a Slow Market With Success
 How to Invest in Real Estate Without Owning Property